Remote access technology is the ability to control aspects of a process from any location via a website or GSM network. An embedded system is a computer system that is designed to perform a variety of tasks. Arduino is an open source-based prototyping platform used to sense and control physical devices.
Is a remote interface the best way to go for Arduino?
Sometimes, a remote interface is the best way to go for an Arduino project. Read on for a simple way to do just that with RemoteXY!
How do I connect my Arduino to the Internet?
Whenever you connect your arduino to your local network (which will be dealt in the coming steps) it is automatically assigned an IP address by your home router using DHCP. Now your router plays a major part here as it acts as the interface between your arduino and the internet.
What is Windows Remote Arduino and universal apps?
A Windows 8.1 Universal app that interacts with an Arduino running Firmata performing GPIO (output AND input) as well as some analog IO. Windows 8.1 IoT: Windows Remote Arduino and Universal apps Project tutorial by David Jones 3,909views 1comment 9respects Turn an LED on and off using Windows Remote Arduino. Windows Remote Arduino
Is it better to connect to Arduino via USB or wireless?
Having wireless access to the Arduino's serial port is often more convenient and useful than a hard wired USB cable. Being able to access the serial port to view and control your Arduino remotely from anywhere via an internet connection opens up many applications and ideas.
Can you control Arduino remotely?
Have you ever thought of controlling your Arduino board remotely without using any shield or module like ESP8266 and Bluetooth? Yes, it is possible with the help of the Blynk App and its server.
How do I control Arduino wirelessly?
You can use a USB dongle, which allows the Arduino to wirelessly communicate with any computer or the web. You can use multi-button keyfobs to add very cool remote control capability to your Arduino projects.
Can we connect Arduino to internet?
The code allows the module to connect to an existing Wi-Fi network and relay data received from the Arduino over serial communication to a server on the Internet or a local network. Next, upload the following code onto the Arduino board to enable communication between the Wi-Fi module and the Arduino.
Can I use Arduino as server?
By equipping an Arduino with an Ethernet shield you can turn it into a simple web server, and by accessing that server with a browser running on any computer connected to the same network as the Arduino, you can perform a variety of tasks. Using an Ethernet shield, you can use an Arduino as a web server.
How does Arduino communicate wirelessly?
6:007:31Arduino Wireless Communication – NRF24L01 Tutorial - YouTubeYouTubeStart of suggested clipEnd of suggested clipStop listening function we set the first arduino as transmitter read and map the value of theMoreStop listening function we set the first arduino as transmitter read and map the value of the joystick from 0 to 180. And using the radio. Write. Function send the data to the receiver.
What does Arduino WiFi do?
The Arduino UNO WiFi allow you to communicate via Wi-Fi with your sensors or actuators mounted on your board to create easily and quickly your IoT System. You can use your Arduino UNO WiFi as a client of your Wi-Fi network, as a server to connect other client devices or you can create an ad'hoc Wi-Fi connection.
Can you ssh into an Arduino?
To connect via SSH, you need the IP address of the Yún, the administrator password, and you'll need to have the Arduino and the computer you're using on the same network. To find the Yun's IP address, make sure you're on the same wireless network, and open the Arduino software.
What is Arduino Ethernet?
The Arduino Ethernet is a microcontroller board based on the ATmega328. It has 14 digital input/output pins, 6 analog inputs, a 16 MHz crystal oscillator, a RJ45 connection, a power jack, an ICSP header, and a reset button.
What is Arduino Ethernet shield?
The Arduino Ethernet Shield allows an Arduino board to connect to the internet using the Ethernet library and to read and write an SD card using the SD library. This shield is fully compatible with the former version but relies on the newer W5500 chip.
How do I program Arduino over Ethernet?
There are a number of steps you need to take to get your Arduino network-ready:Install the arduino-tftpboot bootloader platform package and libraries.Burn the TFTP-compatible bootloader to your Arduino.Setup the configuration for your network.Verify the network configuration.Upload your sketch.More items...
When should I use Raspberry Pi vs Arduino?
In simple, Arduino is used for beginners projects and quick electronics prototyping while Raspberry Pi is used for and some complicated projects can be easily handled by pi.
Can Arduino run HTML?
After opening a browser and navigating to your Ethernet shield's IP address, your Arduino will respond with just enough HTML for a browser to display the input values from all six analog pins.
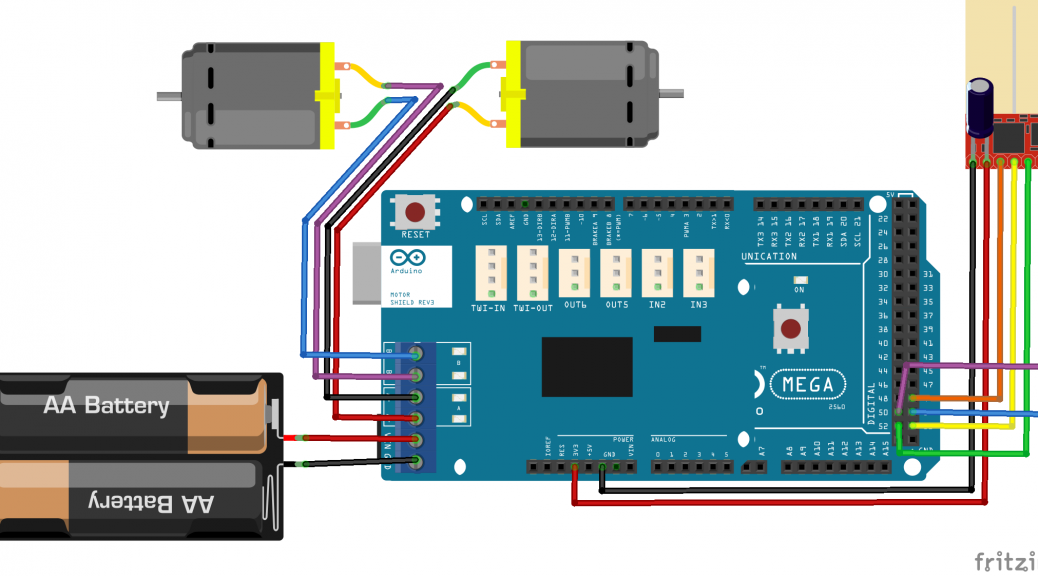
How do I control Arduino?
10:3531:24Arduino Tutorial 37: Understanding How to Control DC Motors in ProjectsYouTubeStart of suggested clipEnd of suggested clipWant run one direction if you put too low and seven high it will run the other direction. So aMoreWant run one direction if you put too low and seven high it will run the other direction. So a digital right - - and a digital right - seven this or this will make it run forward or backwards.
How do I connect my Arduino Android app to Wi-Fi?
About this projectStep 1: Setting Up the Arduino IDE. The first thing we will need to do is add the ESP32. ... Step 2: Arduino Webserver Code. Add the following code in the Arduino IDE and fill in your. ... Step 3: Find the ESP32 IP Address. ... Step 4: The DroidScript App. ... Step 5: Connect the Relay Module. ... Step 6: Test!
What is nRF24L01 transceiver?
nRF24L01 is a single chip radio transceiver for the world wide 2.4 - 2.5 GHz ISM band. The transceiver consists of a fully integrated frequency synthesizer, a power amplifier, a crystal oscillator, a demodulator, modulator and Enhanced ShockBurst™ protocol engine.
How does ESP8266 Wi-Fi module work?
The ESP8266 WiFi Module is a self contained SOC with integrated TCP/IP protocol stack that can give any microcontroller access to your WiFi network. The ESP8266 is capable of either hosting an application or offloading all Wi-Fi networking functions from another application processor.
Step 1: Simplified Electronics Theory
Skip this step, if you’re not interested or already know it. A phototransistor is basically an on-off switch like a light switch or a pushbutton. But it’s controlled by light instead of mechanically pushing the button. When light illuminates the phototransistor, the two leads will (basically) be shorted together.
Step 2: Safety
There are two dangers working with 110Vac. One is electrical shock to a human (or dog). At 110Vac, it takes very little current (5-25mA) to cause harm to a person. That is why all bathrooms and many kitchens are protected with special AC outlets called Ground Fault Interrupters. Two is shorting out AC when plugging in a miswired device.
Step 3: Design
Overview: The radio/antenna on my roof is powered by 110Vac. I wanted to switch this off and on without having to unplug it. My first design was to take a relay, connect it to a power supply, install it in a power strip, and plug the radio/antenna into the power strip. I ran some wires from the power supply to a pushbutton.
Step 4: Implementation
Problem: The first problem is the relay power requirements: 5Vdc at 80mA. The Arduino (actually, the ATmega328) will output 5Vdc at about 20mA maximum. Solution: There is an easy solution for this called a transistor. I have a bunch of old printer PCBs so I looked for some transistors.
Step 5: Wiring the Power Strip
Open up the power strip. (See picture) The one I used has three standard dual AC outlets. From the right on top, basically the black wire from the AC cord connects to a switch, then the circuit breaker, then to first outlet. The first outlet is connected to the second and the second to the third.
Step 6: Wiring the Phototransistor
This yellow object is a book LED I bought at the dollar store. It has a nice little clamp. Well, it only worked for about a day, than I had some trouble turning it on and off. (What can you expect for a dollar.) I thought it would make a nice holder for my phototransistor.
Step 7: Arduino Code & Conclusions
Attached is the code Resetter.zip Arduino code /* Resetter Turns on a relay on for ten seconds, upon reset */ // set pin numbers: const int relayPin = 3; // the number of the relay int oneTime = 1; void setup () { pinMode (relayPin, OUTPUT); } void loop () { if ( oneTime) { // turn relay on: digitalWrite (relayPin, HIGH); delay (10000); // Hold for 10 seconds digitalWrite (relayPin, LOW); oneTime = 0; } } Comment: For this application, I wanted to do a ten second reset only one time after a reset.
How does the world access Arduino?
Then, the world will access your Arduino (via your router) by name, rather than IP address. As your internet service provider changes your router's IP address (typically weekly), DNS will be updated to know where your router went, and the Arduino will remain visible, except for the few minutes just after the router's IP address is changed.
What is a router for Arduino?
The router allows the Arduino exclusive use of an IP address that is local to the network that the router manages. The router may, or may not, perform port-forwarding of data it gets to the Arduino. If the router is set up to forward all data that arrives on port 60, for instance, to the Arduino, then the Arduino will be accessible ...
Why is my Arduino connected to a router?
The router allows the Arduino exclusive use of an IP address that is local to the network that the router manages.
What is port forwarding in Arduino?
Port forwarding is a mechanism where by you tell the cable modem that if a packet comes to your real IP address for port 8080, it should be forwarded to fake IP address 192.168.1.5 (or whatever). That way, an Arduino web server can answer requests.
What is 192.168.1.1?
192.168.1.1 is your routers internal address. you need to find out what you routers external address is. It can tell you in the router, but you can also find out by going to something like ipchicken.com.
Can you use DHCP on Arduino?
Yes, exactly what Zoomkat said, especially the part about manually assigning a static IP instead of letting the Arduino (or any other device) get a DHCP IP. The IP assigned by DHCP is temporary and may change, although usually not. Still, it can happen. In your router / cable modem / whatever, you can control the range of IPs that can be assigned to other devices using DHCP. So, you could tell it that addresses for use by DHCP are from 192.168.1.2 to 192.168.1.31. Then, you can use 192.168.1.40 or any other IP address outside this range on your Arduino. Just make sure its a 192.168.1.x IP address.
How to access Arduino from outside?
1) Try to access arduino from outside your local network (friends network). 2) Try to access arduino through internet from your PC / Laptop. In both the steps the common thing to do is, find out your router's Global/External IP . You find your Global IP by typing "What is my IP" in google.
How to connect an Arduino to the internet?
1) Making our arduino as a web server, using which we can send commands and control the things that are connected to the arduino. Also, you can store and access files remotely.
How to reserve IP address on Arduino?
Go to LAN Settings in your router page and try to reserve your IP address of your arduino that is currently connected, you can identify it using the MAC address we've previously defined. Reserving an IP address will be different for different routers. Search the internet for references. Reserving an IP address will be helpful in port forwarding, since you would require your server to have a constant IP address.
What is EthernetServer.begin?
EthernetServer.begin () ---It tries to establish connection with the router using the user defined MAC address. Although it takes other argumets depending upon the situation. Please check the link Ethernet.begin
Why disable firewall?
Disable your firewall so that you could send requests to the ports other than the reserved ones. Once you are done with your work don't forget to enable your firewall again.
Does Arduino have a local IP address?
So your arduino gets a local IP. Hence whenever you want to communicate/send a message to your arduino over the internet. You access your home router ans send the message to it which in-turn redirects the message to your arduino.
Can I use a predefined IP address on an Arduino?
You could do the same with the IP address also, but i wouldn't recommend so, because when your arduino with a predefined IP and tries to connect to your router it may fail to do so, if the router has already assigned some other device with the same IP Let the DHCP handle the IP address assignment.
How to install Arduino library?
To install the library, go to Tools > Manage Libraries (Ctrl + Shift + I on Windows) in the Arduino IDE. The Library Manager will open and update the list of installed libraries.
How many wires do you need to hook up an IR receiver to an Arduino?
It is very easy to hook up an IR receiver to the Arduino as you only need to connect three wires. The output wire can be connected to any of the digital pins of the Arduino. In this case, I connected it to pin 2 for the first examples below.
How does an infrared (IR) remote and receiver work?
An IR remote and receiver communicate with each other by transmitting and decoding a signal in the form of pulsed IR radiation.
How does the receiver only detect the IR signal coming from the remote?
So how does the receiver only detect the IR signal coming from the remote? The answer is signal modulation.
Can you use an IR remote to control Arduino?
By following the instructions in this tutorial you will be able to use virtually any IR remote (like the one from your TV) to control things connected to the Arduino.
Does a remote detect heat?
Unfortunately, the IR LED in your remote is not the only source of IR radiation. Any object that has a temperature also radiates in the infrared spectrum. This phenomenon is also used by thermal cameras to detect heat.
How to access serial port on Arduino?
The serial port is generally accessed by opening the Arduino IDE's Monitor window or by using a suitable terminal program. The physical connection may be made via a direct cable connection to the Arduino’s USB socket or by connection to the Arduino's Rx & Tx pins and using a TTL to serial USB (eg FTDI) converter.
How to send messages to Arduino IDE?
On the Android device, Open the Serial Wifi Terminal App. In the Devices menu, select add (+). Set the 'Host' to the noted IP address, and port to 23. The Settings, Display ode should be set to 'Termin al'. You should be able to send messages between the Arduino IDE serial monitor screen and the Android Application.
How to find ESP device?
Enter the password to enter 'Advanced Settings'mode and then go to 'Home Network'. Here you should see a list of all devices currently connected to your network and amongst the list you should find the ESP device:-
What is serial UART?
Arduino’s serial UART is the primary route to monitoring and controlling activity in an Arduino. It is useful for debugging, monitoring data values, configuring settings and RTC, plus sending control commands to the Arduino.
Can you control Arduino remotely?
Being able to access the serial port to view and control your Arduino remotely from anywhere via an internet connection opens up many applications and ideas . For a beginner, the simple command / response type terminal interface shown here is easy to implement, it is easy to customise and can be made user friendly by the use of some nice serial terminal Apps on Android.