What is the solution 6000 from Bosch?
The Solution 6000 incorporates Smart Card technology from Bosch, providing an affordable and effective solution for integrated access control for up to 16 doors - making it suitable for anything from the front door of your home up to mid-sized commercial installations.
What is access control solution 6000?
Access Control is no longer reserved only for larger, more expensive systems. The Solution 6000 incorporates Smart Card technology from Bosch, providing an affordable and effective solution for integrated access control for up to 16 doors - making it suitable for anything from the front door of your home up to mid-sized commercial installations.
Where is the Bosch blcc610u 47 solution 6000 located?
Bosch Security Systems 1013 BLCC610U 47 Solution 6000 User Guide Bosch Security Systems 25 Huntingwood Drive Huntingwood, NSW 2128 Australia Phone: +612 9672 1777 Facsimile: +612 9672 1717 © 2013 Bosch Security Systems BLCC610U Issue FTR1.0 Created Date 10/8/2013 2:16:08 PM
How do I program the solution 6000?
Programming You can program the Solution 6000 either by a keypad or using a personal computer using the Solution Link upload/ download software. Bosch Security Systems 03/16 BLCC610R5 Solution 6000 Quick Start Guide

How do I program my Bosch 6000?
To get into programming mode, enter 1234 MENU. This will access the programming mode. To exit programming mode, press and hold the MENU button. MENU 1-1-0 Change own code.
How do you bypass zone on Bosch 6000?
Bypass ZonesEnter [MENU] + 3 + 0 + 2.A list of zones that can be bypassed will display on the keypad. ... Press [ON] or [OFF] to toggle the zone to by bypasses/un-bypassed.Press [OK] to save and exit, or press [MENU] to exit without saving.
How do I connect my phone to my Bosch alarm?
1:3910:37Set Up Mobile Phone Alerts on Bosch Solution 2000 and 3000 Alarm ...YouTubeStart of suggested clipEnd of suggested clipGo into program mode. And change the settings that we need to set up the mobile phone alerts.MoreGo into program mode. And change the settings that we need to set up the mobile phone alerts.
How do I program my Bosch alarm remote?
1:132:43Adding a remote control on a Bosch 3000 alarm panel with an icon ...YouTubeStart of suggested clipEnd of suggested clipOne. So press away and this puts the panel into automatic programming mode so just press the lockMoreOne. So press away and this puts the panel into automatic programming mode so just press the lock button on your remote control.
How do I bypass my Bosch alarm?
2:055:19Bosch B920 Keypad Bypassing Unbypassing Forcing - YouTubeYouTubeStart of suggested clipEnd of suggested clipThrough. All my points until I reached the point I want to bypass. Point number one front door IMoreThrough. All my points until I reached the point I want to bypass. Point number one front door I want to bypass that. Point so enter bypasses so if I hit enter it will be 5 - ask me to hit enter.
How do you bypass an alarm zone?
0:171:30How to Bypass a Zone on Your Honeywell Alarm System - YouTubeYouTubeStart of suggested clipEnd of suggested clipOpen simply press the star key on your keypad in this scenario we will be bypassing zone number 3MoreOpen simply press the star key on your keypad in this scenario we will be bypassing zone number 3 entered as 0. 3 next enter your four-digit code followed by the number 6.
How do I connect my Bosch RSC app?
To then connect to your system, select the profile name , enter your system ARMING Code and then hit Connect. If all the other setup is done correctly and your panel has network connectivity out to the Bosch Cloud Service you should be able to see and control your system.
How do I reset my Bosch house alarm?
1:072:24How to clear faults on Bosch Solution 2000 & 3000 - YouTubeYouTubeStart of suggested clipEnd of suggested clipIssues pressing the away key and then the back button will return you to your normal screen andMoreIssues pressing the away key and then the back button will return you to your normal screen and silence the reoccurring long beep.
How do you program a Bosch 3000 solution?
Enter programming mode: [ 1 2 3 4 # ]Go to the location for System Options 1: [ 4 9 2 # ]Change the 1 to a 13: [ 13 * ]Save and exit: [ 9 6 0 # ]
How do I connect my house alarm to my remote?
0:112:23Programming your Sentry, Sherlo or E.T. remote controls - YouTubeYouTubeStart of suggested clipEnd of suggested clipPress the button on the remote I want to work there. Press on all my program for around about eightMorePress the button on the remote I want to work there. Press on all my program for around about eight seconds.
How do you reset the IP module on a Bosch solution 2000 3000?
To reset and restart the IP module, you need to disconnect the four wired power supply from either the main panel, or from the IP module. Remove the white BUS connector connecter carefully from one of the ends, and then replace it back to the same spot.
How do you program a Bosch TV?
0:262:37Programming a Bosch B426-M IP board with an Icon keypad. - YouTubeYouTubeStart of suggested clipEnd of suggested clipSo type in your installer code abs is still set at the default installer code of one two three four.MoreSo type in your installer code abs is still set at the default installer code of one two three four. So that's what I'm going to be using today. So enter one two three four followed by away.
How many buttons does a keypad have?
Your keypad has 20 keys or buttons. The buttons allow you to input instructions and navigate the menu screens as required. Some buttons have a secondary function which is activated by holding them down for two seconds. Each button’s function is described below:
What is a keypad security system?
It consists of a keypad (or keypads), sensors such as motion detectors or devices located on doors and windows, and other sensing devices designed to detect the presence of smoke or combustion. The location and quantity of sensing devices will have already been discussed with you by your alarm installer. Control of your security system is achieved through the unique graphic keypad, which displays all system information in written text and graphical symbols. Its versatility and ease of operation, make it ideal for any home or business application.
What is a solution 6000?
Listed below are the main features of the Solution 6000 control panel. Up to 144 Fully Programmable Zones Up to 16 Access Doors Fire Alarm Verification Up to 256 User PINs Up to 37 Programmable Outputs Non 24-hour zones respond to alarm conditions Email and SMS Alarm Reporting Optional Fingerprint Readers Supervised Siren Driver conditions or to provide a delay for you to reach the keypad 16 Programmable TimeZones Up To 8 Areas (Common Area Programmable) throughout your premises. Built-In Dialer Up To 16 Fully Supervised Keypads / Readers National Broadband Network / IP Ready Keyswitch Input (Programmable) 1000 Event History Memory EMI / Lightning Transient Protection Programmable Via Keypad Remote Programmable Via RAS Software when the system is armed. You may need to bypass a Automatic Test Reports Built-In Telephone Line Fail Monitor
How to extend auto arming time?
If for some reason you are still in the building when the auto arming is taking place then it is possible to extend or delay the auto-on time (automatic arming time) by one hour simply by entering your PIN + [OFF] during the auto-on pre-alert time. The auto-on pre-alert time sounds the keypad buzzer to warn you that the system will automatically turn All On. Example: If the control panel is programmed to automatically turn All On at 6:00pm and the auto-on pre-alert time starts beeping the keypad at 5:55pm, entering your PIN between 5:55pm and 6:00pm will delay the auto-on time by one hour and the auto-on pre-alert time will again commence at 6:55pm. Therefore the system will automatically turn All On at 7:00pm.
How to use DTMF control?
How to Use DTMF Control 1. Once the panel answers the incoming call, the panel will play a short welcome jingle. You now have approximately 5 seconds to enter a valid PIN and log onto the panel. 2. Enter PIN followed by the [#] key on your phone. If the PIN is valid the system will respond with two short beeps. If the PIN is invalid then a single long beep will be heard. If a valid PIN is not entered in time, the panel will attempt to establish a modem connection as if connecting to the Solution Link software. If this happens you will need to hang up for approximately 60 seconds before trying again. 3. Once validated, the following commands can be performed. If no keys are pressed for 20 seconds or the user presses
- ]
- ], the control panel will play the exit jingle and terminate the session. DTMF CONTROL FUNCTIONS Operation Command Tone Response Quick Arm All Areas [0] +
- ] High, Medium, Low Log In OK [PIN] +
- ] Low, High Error Incorrect Entry Long Beep Turn Area All On [1] + [Area Nº] +
- ] + [1] Low, High Turn Area Off [1] + [Area Nº] +
- ] + [2] High, Low Turn Output On [2] + [Output Nº] +
- ] + [1] Low, High Turn Output Off [2] + [Output Nº] +
- ] + [2] High, Low End Session
- ] +
- ] High, Medium, Low
- ] +
- ] + [2] High, Low End Session
- ] + [1] Low, High Turn Output Off [2] + [Output Nº] +
- ] + [2] High, Low Turn Output On [2] + [Output Nº] +
- ] + [1] Low, High Turn Area Off [1] + [Area Nº] +
- ] Low, High Error Incorrect Entry Long Beep Turn Area All On [1] + [Area Nº] +
- ] High, Medium, Low Log In OK [PIN] +
- ], the control panel will play the exit jingle and terminate the session. DTMF CONTROL FUNCTIONS Operation Command Tone Response Quick Arm All Areas [0] +
What is the ON key on a laptop?
The [ON] key allows you to turn an area or output on. If your system has been partitioned press and hold the [ON] key for two seconds to turn all areas on at the same time.
How to arm a DTMF?
To arm the system call the number which the panel is connected to and when the panel answer you will here 3 beeps in accending frequency if the panel is in the disarmed condition. Press [0] + [#] to arm. You will hear 3 beeps in decending order when the panel arms. All areas on the system will be armed regardless of there condition when using the DTMF quick arm function.
What are the features of the 6000 control panel?
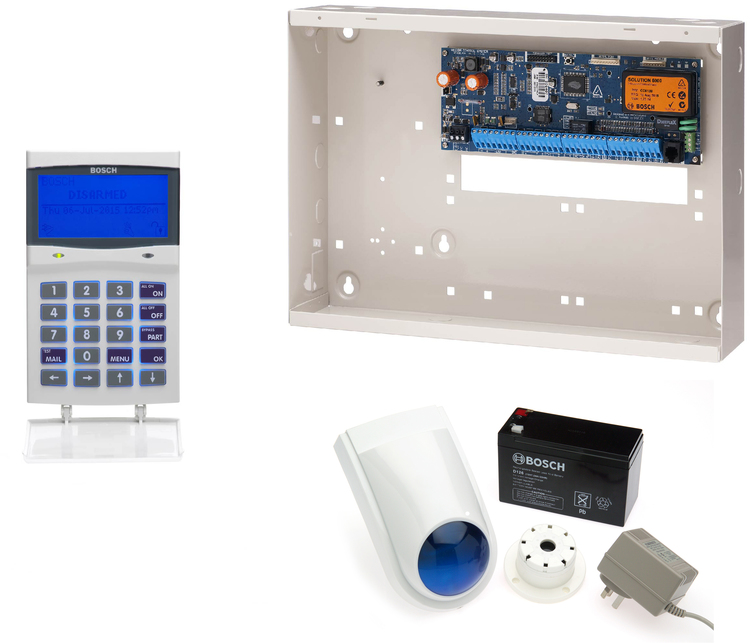
♦ Individual Box Tamper Circuit Monitoring ♦ Report Via Email (Internet) ♦ Telephone Line Busy Tone Detect ♦ RAS Intelli-Connect® CLI Caller Line Identi!cation ♦ Daylight Savings ♦ Senior Watch ♦ GSM/GPRS/Ethernet Reporting Options ♦ System Maintenance Interval Reminder ♦ System Weekly Test Reminder ♦ Area Inactivity Interval ♦ Up to 16 Access Doors ♦ Temporary PIN ♦ Dual Reporting ♦ Dual Redundant Reporting ♦ Alarm Report Abort/Cancel Options ♦ 8 Programmable Holiday Calendars ♦ 16 Programmable TimeZones ♦ 8 On-board Zones (Single EOL) / 16 On-Board Zones (Dual EOL) ♦ Expandable To 144 Zones) ♦ Fire Alarm Veri!cation ♦ 255 PIN Users ♦ 4 Supervised High Power Digital Outputs ♦ 1 Relay 2 Amp Form (C) Contact (Expandable to 32) ♦ Supervised Siren Driver ♦ Partitionable To 8 Areas ♦ Dialler Reports SIA, Contact ID, SMS and Email Formats ♦ Supervised LAN Keypads (Maximum 16 Keypads) ♦ Keyswitch Input ♦ 1000 History Event Memory ♦ EMI / Lightning Transient Protection ♦ Fully Menu Text Programmable ♦ Programmable Via Solution Link Software (Remote/ Direct) ♦ Telephone Line Fail Monitor ♦ TimeZone Executed Functions ♦ 60+ Output Event Types ♦ Exit Restart ♦ Expansion Module Supervision ♦ DTMF Tone Decoder Built In ♦ Remote Arming ♦ Fingerprint Reader Options Overview Zones The Solution 6000 control panel provides up to 144 separate zones of protection. Zone programming determines the panel’s response to open/short and tamper conditions on the zone loop. Areas The control panel supports up to 8 separate areas. You can assign all zones to a single area, or you can assign each zone to a combination of di"erent areas. You can arm and disarm the control panel by area, alternatively, you can arm and disarm several areas at the same time. Dialler The control panel has a built-in dialler to send reports to the receiving party (ie. Security company monitoring station, mobile phone etc). Keypads You can connect a maximum of 16 fully supervised keypads to the control panel. The available current a"ects the total number of keypads that you can connect without the need to provide additional power supplies. History Log The control panel can store up to 1000 history events from all 8 areas. All events are stored in the log, even if they are programmed not to report via the on-board dialler. You can view the control panel’s history log via keypad, or by connection of a personal computer (direct/remote) using the SolutionLink upload/download software. Programming You can program the Solution 6000 either by a keypad or using a personal computer using the Solution Link upload/ download software.
How many keypads can be connected to a control panel?
The control panel can have a maximum of 16 keypads and/or readers connected via the LAN terminals. Each keypad or reader must be set to a unique address before they will operate.
What is a MW730B panel enclosure?
About The Panel Enclosures The MW720B - Small Enclosure and MW730B - Large Enclosure have been designed to reduce installation time and improve aesthetics on larger installations where often multiple enclosures need to be located in close proximity to each other. A number of new features have been incorporated including a new style tamper bracket which can be easily installed before or after the enclosure is mounted to the wall, an anti tamper lid which insures the cabinet tamper triggers when the lid is removed, easier access for $exible and rigid conduits, additional 20mm cable entry knockouts and a new board mounting system using removable spring clips. The MW720B and MW730B enclosures include numerous holes, allowing the PCB mounting clips to be positioned in the most appropriate location for each installation.
How many zones does a solution 6000 control panel have?
The Solution 6000 control panel provides up to 144 separate zones of protection. Zone programming determines the panel’s response to open/short and tamper conditions on the zone loop.
What is control panel?
The control panel incorpora tes a menu text driven interface. This interface is very similar to that found on many mobile phones. Once programming mode is entered you will see a number of menu options in the display and these may vary depending in the user authority level.
How to program a phone number?
To program, select primary telephone number under [MENU] 5-1-1 then enter the digits of the telephone number and press the [OK] key to save. Use the up and down arrow keys to program special characters (*, # and Pause).
What is expansion options table 1?
Table 1: Expansion Options Use the above table to help determine which size cabinet you will require for the job. On some export models, one module space will not be available as the mains transformer mounts in this location.
Adding a token to a user
Select add token and user if prompted by keypad select reader Menu 120 Select door/s that the user will have access to (if applicable) Menu 145 Select areas that the user will belong to Menu 141
Download Installer Manual & Cheat Sheet
Download the Installer Manual & Cheat Sheet to your phone or computer.